Wednesday, December 1, 2010

Cinnamon Bun Pancakes

Cinnamon Bun Pancakes

1 1/2 cups all purpose flour
3 tbsp white sugar
1/2 tsp salt
4 tsp baking powder
1 tbsp cinnamon
2 whole eggs, beaten
1 cup milk
2 tbsp corn syrup
1/4 cups butter, melted
1 tbsp vanilla

1.  In a medium bowl, combine flour, sugar, salt, baking powder, and cinnamon with a whisk.  Whisk well to make sure everything is combined.

2.  In a separate large bowl, beat together eggs, milk, corn syrup, butter, and vanilla.  Stir in flour mixture. 

3.  Heat a lightly oiled griddle or frying pan over medium low heat.  Pour about 1/4 cup batter onto griddle.  Brown on both sides.

4.  Serve warm with icing drizzled over the top.


There was no icing recipe with this recipe, however, the recipe does say that you can use syrup or just mix powdered sugar and milk until you reach the desired consistency.  I wanted something a little more cinnamon roll icing like, so I improvised a recipe that I use for maple cinnamon roll frosting.  However, the bad thing about this was, that I cut a recipe down significantly, because the recipe makes enough icing to frost 7 dozen cinnamon rolls.  So you can use this recipe


Maple Icing

1/2 pound powdered sugar
1/8 cup milk
1 1/2 tbsp melted butter
1/16 cup strongly brewed coffee
half of a dash of salt
1/4 tbsp maple extract

1. In a large bowl, whisk together powdered sugar, milk, butter, coffee, and salt.  Add in the maple flavoring.  Whisk until smooth. Taste and add in more maple, sugar, butter or other ingredients as needed until the icing reaches desired consistency.  In order for the best results on the pancakes, the icing should be thick, but still pourable.


I was really surprised by this recipe.  It wasn't what I was expecting in all.  Cinnamon bun is exactly right.  With the icing used as syrup, these taste just like an old fashioned cinnamon role.  They are fairly easy to make, and they are very filling.  They were good leftover, a little drier than I would have cared for, but still very good.  It's definitely something that I would make again.  They are fancy enough for a special breakfast, yet simple enough for an everyday meal.


Monday, November 22, 2010

Fiesta Smothered Chicken

Fiesta Smothered Chicken

3 tbsp reduced sodium soy sauce
1 tbsp Worcestershire sauce
1/4 tsp garlic powder
2 boneless skinless chicken breast halves (5 oz each)
1/2 cup sliced fresh mushrooms
1/4 cup chopped onion
4 tsp chopped seeded jalapeno pepper
6 tsp butter, divided
1/4 cup shredded pepper jack cheese
1/4 cup shredded cheddar cheese

1.  In a large resealable plastic bag, combine the soy sauce, Worcestershire sauce, and garlic powder; add the chicken.  Seal bag and turn to coat; set aside.

2.  In a large nonstick skillet coated with cooking spray, saute the mushrooms, onion, and jalapeno in 2 tsp butter until tender.  Remove and keep warm.

3.  Drain and discard marinade.  In the same skillet, cook chicken in remaining butter over medium heat for 4-5 minutes on each side or until juices run clear.  Spoon vegetable mixture over each chicken breast, sprinkle with cheeses.  Cover and cook for 1-2 minutes or until cheese is melted. 

Makes 2 servings
1 breast, prepared with reduced fat butter and reduced fat cheddar cheese
Cal 314; fat 17; fiber 1


I was kinda disappointed in this recipe.  Don't get me wrong, it was very good, yet it seemed to be missing something.  I had a hard time to get my chicken to cook, so I ended up throwing the lid on the skillet and putting it in the oven.  When the chicken was finally done, I put the sauteed veggies on top and added the cheese, put the lid back on and turned the burner on, long enough to melt the cheese.  Worked out really well.  I had more veggies than chicken, so there was a lot of veggies, but the breasts were fairly large size.

Friday, November 19, 2010

Cauliflower Au Gratin

Cauliflower Au Gratin

3 packages (16 oz each) frozen cauliflower, thawed
1 large onion, chopped
1/3 cup butter, cubed
1/3 cup all purpose flour
1/2 tsp salt
1/4 tsp ground mustard
1/4 tsp pepper
2 cups fat free milk
1/2 cup grated Parmesan cheese

TOPPING:
1/2 cup soft whole wheat bread crumbs
2 tbsp butter, melted
1/4 tsp paprika

1.  In a Dutch oven, bring 1 inch of water to a boil.  Add cauliflower; return to a boil.  Cover and cook for 3 minutes.  Drain and pat dry.

2.  Meanwhile, in a large saucepan, saute onion in butter until tender.  Stir in the flour, salt, mustard and pepper until blended; gradually add milk.  Bring to a boil; cook and stir for 1-2 minutes or until thickened.  Remove from the heat.  Add cheese; stir until melted

3.  Place cauliflower in a 13x9 baking dish coated with cooking spray.  Pour sauce over the top.

4.  For topping, combine the bread crumbs, butter and paprika.  Sprinkle over the sauce.  Bake, uncovered, at 350* for 30-35 minutes or until bubbly.

Makes 12 servings; 3/4 cup each
Cal 142; fat 8; fiber 3


I was really surprised.  I love cauliflower, but have only had it plain and with cheese, so I was a little leery of making this.  This stuff is awesome.  I did half the recipe, because it was just for 2 people and I didn't want leftovers for days.  So I used 1 full bag, and part of another bag of frozen cauliflower.  I put it in a large glass bowl, added an inch or so of water and covered the top with plastic wrap.  I microwaved for 4-5 minutes, then let it sit in the microwave for about 5 minutes or so.  The cauliflower was slightly warm, probably close to room temperature.  I drained the water, and then dumped the cauliflower on a paper towel to get any remaining water off of it.  Then I started the sauce, and I followed the directions, just used half of the ingredients.  The sauce comes together and thickens quickly, so have your cauliflower in the pan ready to pour.  Because my sauce sat a little bit, it was very thick and not very pourable.  So I ended up stirring the cauliflower all up in order to coat the cauliflower a little better. I also sprinkled just a little more paprika over the top before I baked it.

Thursday, November 18, 2010

Nutella Caramel Hazelnut Brownies

Nutella Caramel Hazelnut Brownies

1/2 cup all purpose flour
1/3 cup cocoa powder
1/4 tsp baking powder
1 pinch salt
1 cup sugar
1/2 stick unsalted butter
2 whole eggs
1 tsp vanilla extract
1/4 cup Nutella - melted
1/4 cup caramel sauce - melted
1 bag (8 oz) small bag of hazelnuts, or more if desired

1.  Preheat oven to 350*.

2.  In a mixing bowl, add your flour, baking powder, salt and cocoa powder.  Using a whisk, mix together and set aside.  Into your stand mixer, add the sugar and butter; cream together.  Add in eggs one at a time and mix well.  Add in your vanilla.  Gradually add in your flour mixture until it's well combined.  Batter should be thick and sticky.

3.  Spray an ovenproof dish with cooking spray.  Place a piece of parchment paper (slightly larger than your dish to allow for handles) inside.  It will adhere to the bottom of the dish.

4.  Take half of your brownie batter and smooth it on top of the parchment paper.  Take your caramel sauce and spoon it on top of the brownie mixture, covering the entire layer of brownie.  Place the remaining brownie batter on top, smoothing it out.  Place in the oven and bake for 30-40 minutes until sides are firm and center is no longer jiggly.

5.  Allow brownies to cool completely before removing.  Cut your brownies to your desired size using a serrated knife.  Make a small indention with your finger into each brownie.  Take your melted Nutella and drizzle over the tops of the brownies.  Garnish with the hazelnuts.


I was very, very disappointed in these.  They tasted a lot like frosted brownies, except with a helluva mess.  I didn't use a stand mixer, just a hand mixer.  The brownies looked overcooked after 30 minutes, yet they were still moist and gooey.  I had a hard time finding hazelnuts, and when I finally found some they had to be toasted, and they just didn't taste right.  So I didn't use the nuts.  I was really looking forward to trying this and was disappointed enough, that I seriously doubt, I will ever make them again.

If you make them and do something different let me know. Sorry for the poor quality pictures, these just fell all apart.

Wednesday, November 17, 2010

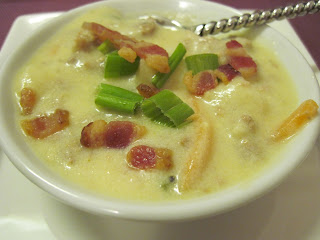
Cheeseburger Paradise Soup

 Cheeseburger Paradise Soup

6 medium potatoes, peeled and cubed
1 small carrot, grated
1 small onion, chopped
1/2 cup chopped green pepper
2 tbsp chopped seeded jalapeno pepper
3 cups water
2 tbsp plus 2 tsps beef bouillon granules
2 garlic cloves, minced
1/8 tsp pepper
2 pounds ground beef
1/2 pound sliced fresh mushrooms
2 tbsp butter
5 cups milk, divided
6 tbsp all purpose flour
1 package (16 oz) Velveeta cheese, cubed
crumbled cooked bacon

1.  In a soup kettle, combine the first nine ingredients (through pepper); bring to a boil.  Reduce heat; cover and simmer for 15-20 minutes or until potatoes are tender.

2.  Meanwhile, in a large skillet, cook beef and mushrooms in butter over medium heat until meat is no longer pink; drain.  Add to soup.  Stir in 4 cups milk; heat through.

3.  In a small bowl, combine flour and remaining milk until smooth; gradually stir into soup.  Bring to a boil; cook and stir for 2 minutes or until thickened.  Reduce heat; stir in cheese until melted.  Garnish with bacon.

Makes 14 servings (about 3 1/2 quarts)


What is a soup kettle?!?  I put the potatoes in a large stockpot.  I had to add more water than the 3 cups to cover my potatoes.  I either had more than they did (the soup was perfect) or they didn't completely cover theirs with water.  I had planned on scooping out some of the water when my potatoes were done, but I forgot and did not do that.  The soup wasn't watery either.  Probably not as thick as they had in mind, but it was still soup consistency. 

I seasoned my meat with a some gourmet burger seasoning.  You could leave it plain, but I didn't want the meat bland.  The soup tastes great, yet, it is still a little bland.  So I would taste it, and adjust accordingly.  I also didn't dump all the stuff in with the potatoes.  I browned the ground turkey (beef) and when it was about halfway to 3/4 done I added all the vegetables and cooked it in with the meat.  Once the potatoes were done I just dumped it all in with the potatoes.

Thursday, November 11, 2010

Taco Casserole

Taco Casserole

3 cups uncooked bow tie pasta
1 pound ground beef
1/4 cup chopped onion
2 cups (8 oz) shredded cheddar cheese
1 jar (16 oz) salsa
1 can (14 1/2oz) diced tomatoes, undrained
1 envelope taco seasonings
2 cups nacho tortilla chips, crushed

1.  Cook pasta according to package directions.  Meanwhile, in a large skillet, cook beef and onion over medium heat until meat is no longer pink; drain.  Add the cheese, salsa, tomatoes, and taco seasoning.  Drain pasta; stir in beef mixture.

2.  Transfer to a greased 11x7 baking dish.  Cover and bake at 350* for 20 minutes.  Uncover; sprinkle with tortilla chips.  Bake 10 minutes longer or until heated through.


I was a little worried as I made this that there would be overwhelming amounts of tomato.  However, this came out perfect.  It wasn't saucy at all.  I sprinkled a little bit of cheese over the top and then put the chips on it and baked it.  This really helped the chips to stick to it instead of being "loose".  This makes quite a bit of casserole, and the leftovers are good, but the chips get soggy.  I just crumbled up a few fresh ones over the top, and it was just as good as it was the night before.  However, the next time that I make this, I'm only going to put chips on half, and the just crumble fresh chips over the leftovers the next day.

Wednesday, November 10, 2010

Bombay Chicken

Bombay Chicken

1 1/2 cups (12 oz) plain yogurt
1/4 cup lemon juice
2 tbsp chili powder
2 tbsp paprika
2 tbsp olive oil
1 1/2 tsp salt
1/2 to 1 tsp cayenne pepper
1/2 tsp garlic powder
1/4 tsp ground ginger
1/4 tsp ground cardamom
1/8 tsp ground cinnamon
4 to 5 pounds bone in chicken thighs and legs, skin removed

1.  In a large resealable plastic bag, combine the first 11 ingredients.  Add the chicken; seal bag and turn to coat.  Refrigerate overnight. 

2.  Rub grill rack with oil or coat with cooking spray before starting the grill.  Drain and discard marinade.

3.  Grill chicken, covered, over medium hot heat for 10-15 minutes on each side or until a meat thermometer reads 180*.

makes 8 servings; one servings (4 oz cooked dark meat)
Cal 255; fat 13; fiber 1


I was a little leery of this while I was making the marinade.  It is about the color of chili - only a little lighter.  I didn't taste of the marinade because of the oil in it.  But, we dumped in the chicken, squished it all around to get it all nicely coated and plopped it in the fridge. 

It was a little windy, so we had a few issues while we were grilling it, but it could be easily baked.  I would just line the pan with foil, as the chicken wanted to stick to grill. 


I was really surprised at how mildly flavored the chicken turned out.  It was very good, this would make a very, very good base, to make BBQ chicken or something else will as well.  It's a definite keeper!